Setting up your capture hardware
Note
We are working on a much more extensive document, which will also explain how to setup your space, procure equipment, etc. Contact us if you are interested in helping us write or debug this document.
Currently cwipc supports Microsoft Kinect Azure, Intel RealSense D400 series, and Orbbec Femto series cameras.
It also supports pre-recorded footage of those cameras, as .mkv or .bag files. See below.
Note
All types are fully supported on Windows. On Linux and Mac only the Realsense and Orbbec cameras are supported, but there are major
issues at the moment for USB-conected cameras (basically you have to run everything as root). Realsense and Orbbec recordings
are supported on Mac. Ethernet-connected Orbbec cameras are fine on the Mac.
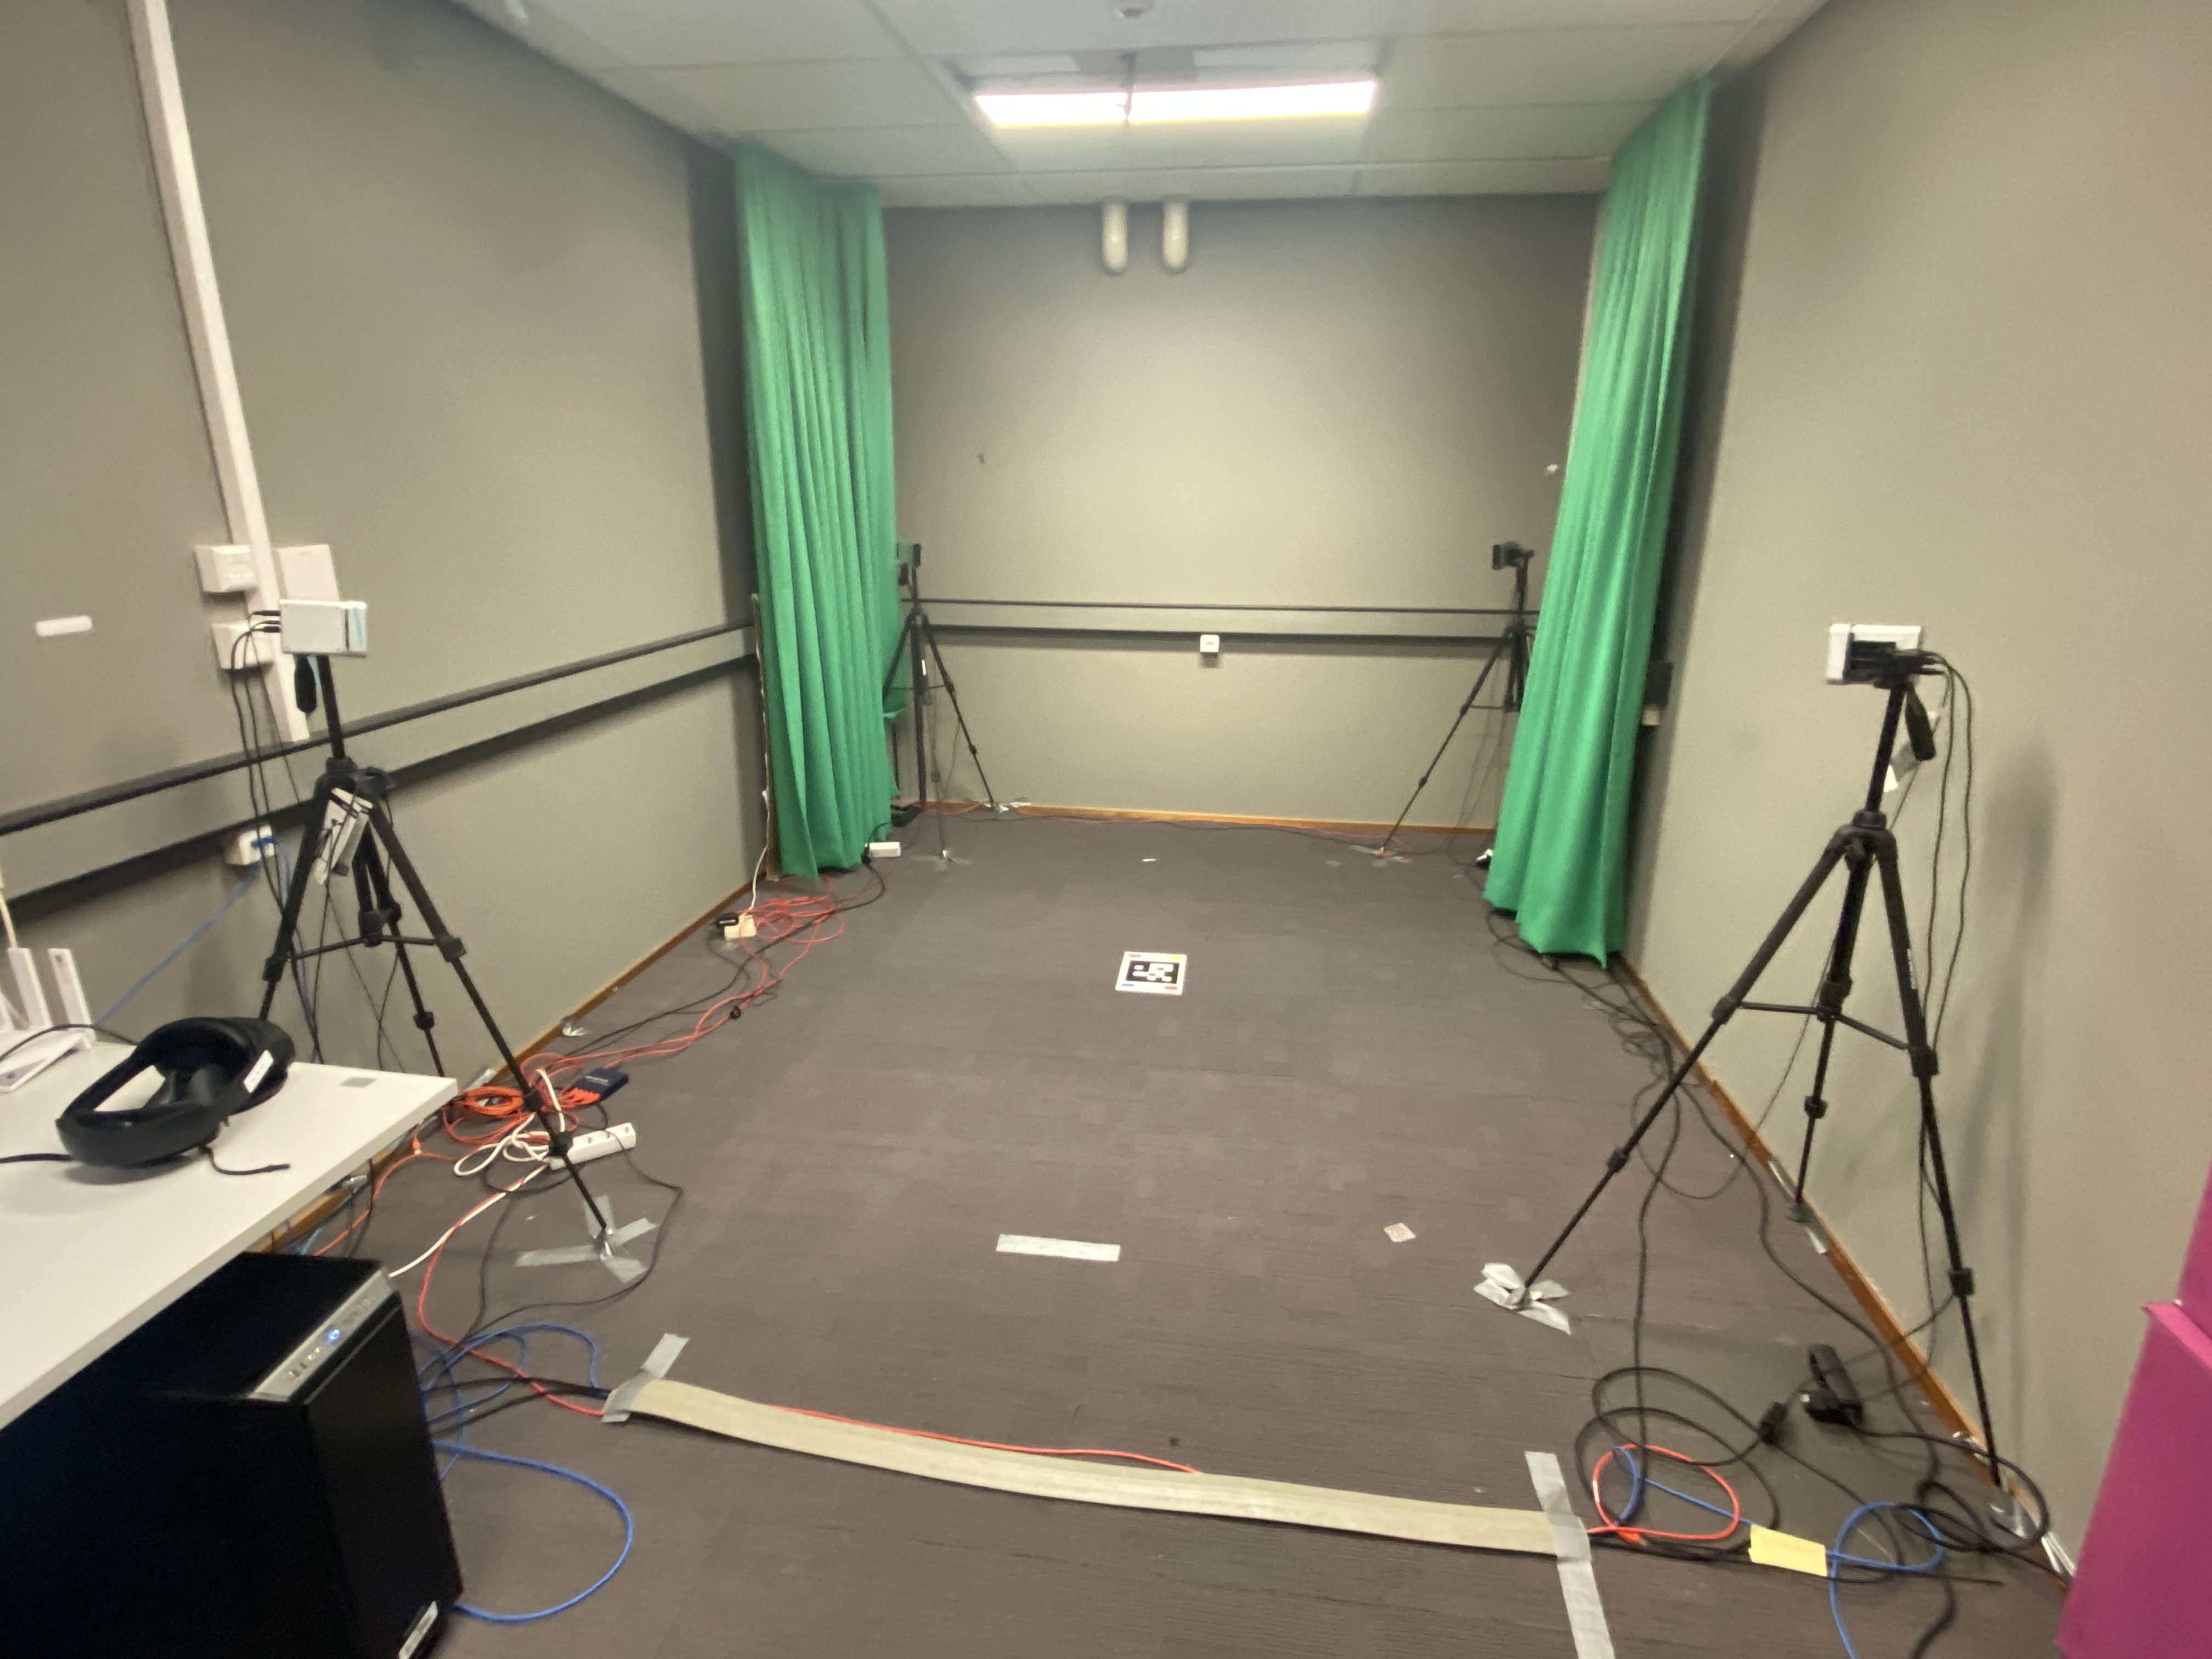
The preferred way to use your cameras is to put them on tripods, in portrait mode, with all cameras having a clear view of the floor of your origin, the natural “central location” where your subject will be. But see below for situations where this is not possible.
Here is a picture of a four-camera setup:
Note
Hardware setup documentation with photos showing cable management, tripod configurations, multi-camera synchronization setups, and other practical arrangements welcome. Please contribute your setup photos and tips.
You need to print the origin Aruco marker,
which you see in the center of the picture above. If that link does not work: you can also find the origin marker in your
installation directory, in share/cwipc/registration/target-a4-aruco-0.pdf, or online at the GitHub link above.
Registering your cameras consists of a number of steps:
Setup your hardware.
Find the cameras attached to your system.
Setup correct camera views, exposure, etc.
Do a coarse registration by finding the Aruco marker image. This creates a 4x4 transformation matrix for each camera which will ensure that all cameras use approximately the same coordinate system.
Do a fine registration by capturing a human and slightly adjusting the transformation matrices so we get the best possible overlap between the captures.
Normally the following command will take you through each of these steps (except for setting up the hardware) and tell you what to do:
cwipc register --guided
But sometimes it may be needed to have more control over the process, or repeat a step, or something else. See the section Special cases below for more details on this.
Steps for guided registration
First cwipc register --guided with auto-detect available cameras (unless there already is a cameraconfig.json in the current directory, in which case it will skip this step).
Then it will do the coarse registration: you will be shown the RGB images captured, and when the marker is visible you can press w to capture that frame and use it for the coarse registration.
After that you will be shown the point cloud captured and fused. Inspect it to see if the cameras are roughly aligned. Edit the cameraconfig.json file to adjust while balance, exposure, etc.
Also adjust near and far and radius_filter. For now set height_max to something like 2m20 but set height_min to a small negative value, so you capture some floor.
Now do a floor alignment.
Finally capture a person standing at the origin, with arms slightly spread, and looking in the direction between the first camera and one of the adjacent cameras. Press w to capture this frame and use it for fine registration.
Hardware setup
Ensure that all cameras are working (using Realsense Viewer, Azure Kinect Viewer, or Orbbec Viewer). If you have multiple cameras you are going to need sync cables to ensure all the shutters fire simultaneously for best results. See the camera documentation. You probably want to disable auto-exposure, auto-whitebalance and all those. Set those to manual, and in such a way that the colors from all cameras are as close as possible.
You may need USB3 range extenders (also known as active cables) to be able to get to all of your cameras. Ensure these work within the camera viewer.
Checking your camera position and orientation
Note
Usually cwipc_register --guided will take you through this process just as easily.
This section left here for reference.
Put your origin marker on the floor and ensure all cameras can see it in RGB and Depth. The latter may be a bit difficult (because you can’t see the marker in Depth).
Here is an example of what you should see in Kinect Viewer (or similar in Realsense Viewer):
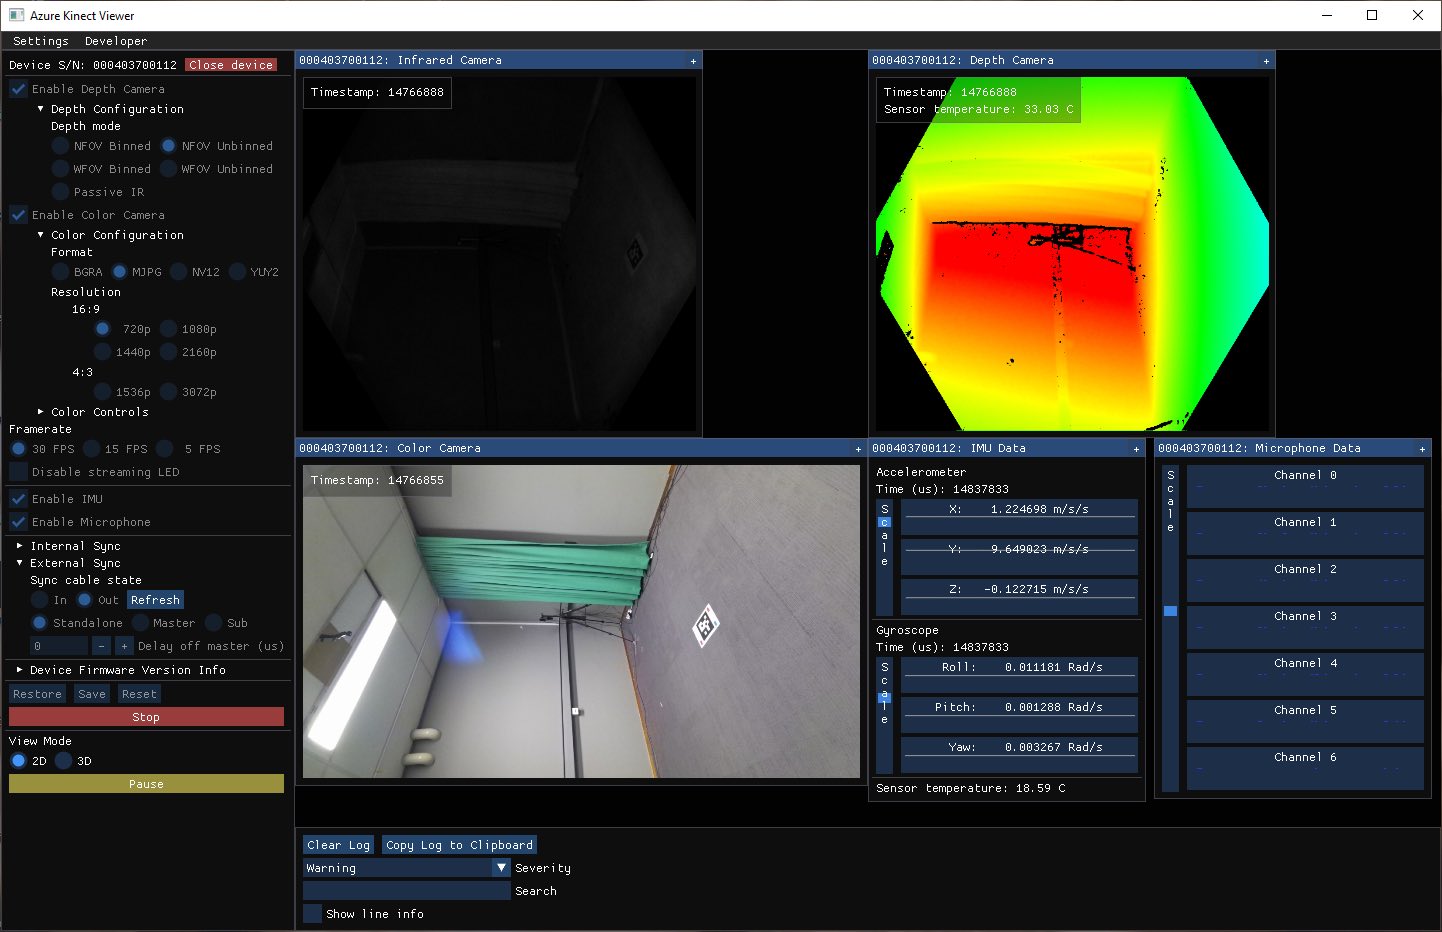
Have a person stand at the origin and ensure their head is not cut off. Adjust camera angles and such. Lock down the cameras, all of the adjustable screws and bolts and such on your tripods. And lock the tripods to the floor with gaffer tape.
Finding your cameras
Note
Usually cwipc_register --guided will take you through this process just as easily.
This section left here for reference.
The first step is to use cwipc register --noregister to create a cameraconfig.json file that
simply contains the serial number of every camera. If there already is such a file in the current
directory this step does nothing. Remove the cameraconfig.json file if you want to re-run.
Usually it will find what type of camera you have attached automatically. If this fails you can supply
the --kinect, --realsense, or --orbbec option to help it.
Coarse registration
Note
Usually cwipc_register --guided will take you through this process just as easily.
This section left here for reference.
The easiest way to do coarse calibration is to put the origin marker on the floor (the picture above
gives you an idea of where you should place your origin marker) and run cwipc register --rgb --nofine.
This will run a coarse calibration step for each camera in turn, but only if the camera has not been
coarse-calibrated before. In other words, you can run this multiple times if some cameras were missed
the previous time. But on the other hand if you had to move cameras you should remove cameraconfig.json
and restart at the previous step.
For each camera, the RGB image is used to find the origin marker Aruco pattern. The Depth image is then
used to find the distance and orientation of the Aruco marker from the camera. This information is then
used to compute the 4*4 transformation matrix from camera coordinates to world coordinates, and this
information is stored in cameraconfig.json.
If the Aruco marker cannot be found automatically you can also use a manual procedure, by not supplying
the --rgb argument. You will then be provided with a point cloud viewer window where you have to manually
select the corners of the marker (using shift-click with the mouse) in the right order.
After this step you have a complete registration. You can run cwipc view to see your point cloud.
It should be approximately correct, but in the areas that are seen by multiple cameras you will see the
alignment is not perfect.
Limiting your point clouds
Important
This section is important, even when using cwipc register --guided
At this point, if you view your point cloud with cwipc view you will see that it contains all the walls,
floor, ceiling, furniture, etc. All cameras should be somewhat aligned by the coarse calibration.
Note
Currently you have to fix this by manually editing cameraconfig.json. It should be possible to
edit cameraconfig.json while cwipc view is running, and then typing c to reload
cameraconfig.json. But this does not always work, you may have to stop and restart cwipc view
to see the result of your edits.
Near and far points
The first thing to edit is threshold_near and threshold_far. These are the near and far point for
all depth cameras (in meters). Adjust these to get rid of most of the walls, while keeping the whole target
area visible. Looking at the floor is a good way to determine how you are doing.
Radius
There is another parameter you can play with: radius_filter applies a cylindrical filter around the origin.
Remove ceiling
Next adjust height_min and height_max to get rid of the ceiling, but keep the floor for now.
Both have to be non-zero otherwise the filter will not be applied (but height_min can be less than zero
if you want to keep the floor visible).
Fine registration
Note
Usually cwipc_register --guided will take you through this process just as easily.
This section left here for reference.
If you have only a single RGBD camera there is no point in doing fine calibration, but if you have multiple cameras it will slightly adjust the registration of the cameras to try and get maximum overlap of the point clouds.
Have a person stand at the origin.
Note
Note: at the moment, the pose of you subject is important. Best results are obtained by having the person look in the direction between the first camera and one of the adjacent cameras. Arms should be slightly spread, or maybe angled forward at the elbows.
Run cwipc register. If there is already a complete coarse calibration for all cameras this will
automatically do a fine calibration. If you are using cwipc register --interactive type a w
to capture a point cloud and start the registration.
The algorithm will iterate over the cameras, making slight adjustments to the alignment. When it cannot
improve the results any more it stops and saves cameraconfig.json.
Check the results with cwipc view.
Warning
The algorithm is not perfect, and it can sometimes get into a local minimum. You will see this as a disjunct point cloud, often with cameras pairwise aligned and those pairs disaligned.
The workaround is to try fine alignment again, with the subject standing in a different pose.
Remove floor and ceiling
Next adjust height_min and height_max to get rid of both floor and ceiling. Both have to be
non-zero otherwise the filter will not be applied.
Color matching
You probably want to play with the various exposure parameters such as color_whitebalance and
color_exposure_time to get the best color fidelity, but you really have to experiment here.
We are working on partially automating this process, but that is not done yet.
Depth exposure can be left on auto (if the camera supports it) but color should be manual, so that it is the same for all cameras.
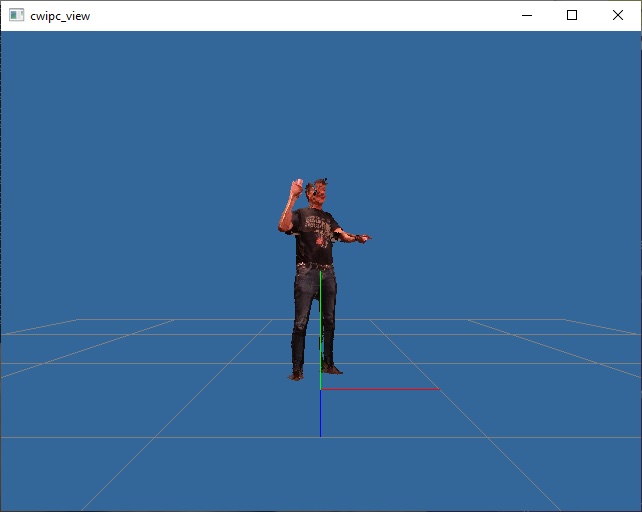
Final results
After all the steps have been done you should be able to get point clouds like the one below.
Special cases
Setting up specific camera types
If you have multiple camera types attached you can specify which type of camera you want to register with the --kinect, --realsense, or --orbbec options:
cwipc register --kinect --guided
The camera type is only needed while finding the cameras, so after an initial cameraconfig.json has been created it is no longer needed.
Setting up a recording
If you have created a recording recently, according to the guidelines in Recording point cloud streams, there is no need to do a registration: the
cameraconfig.json file in the recording directory already contains all the necessary information.
But if you have created a recording in the past, and you only have a directory with the raw .mkv or .bag files, you can create a cameraconfig.json for this recording with the following steps:
cwipc register --guided /path/to/recording
Your recording should have captured the origin marker at some point, and also contain at least one capture that is suitable for fine registration (i.e. a person standing at the origin, with arms slightly spread, and looking in the direction between the first camera and one of the adjacent cameras).
Registering head-and-shoulders shots
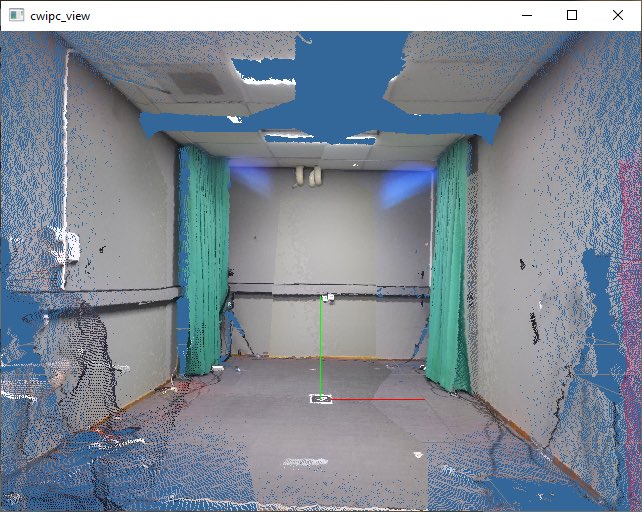
There is a way to register a single camera without any markers at all. If your camera is in landscape
orientation, at approximately 1.20m height, and approximately 1m away from a seated subject.
Incidentally, this is exactly what happens if you put the camera on your desk, on a small tripod, next to your monitor.
If you now run cwipc register --tabletop you will get a cameraconfig.json that will capture
a head and shoulders shot of you.
Here is a picture of the setup and the resulting point cloud in cwipc view:
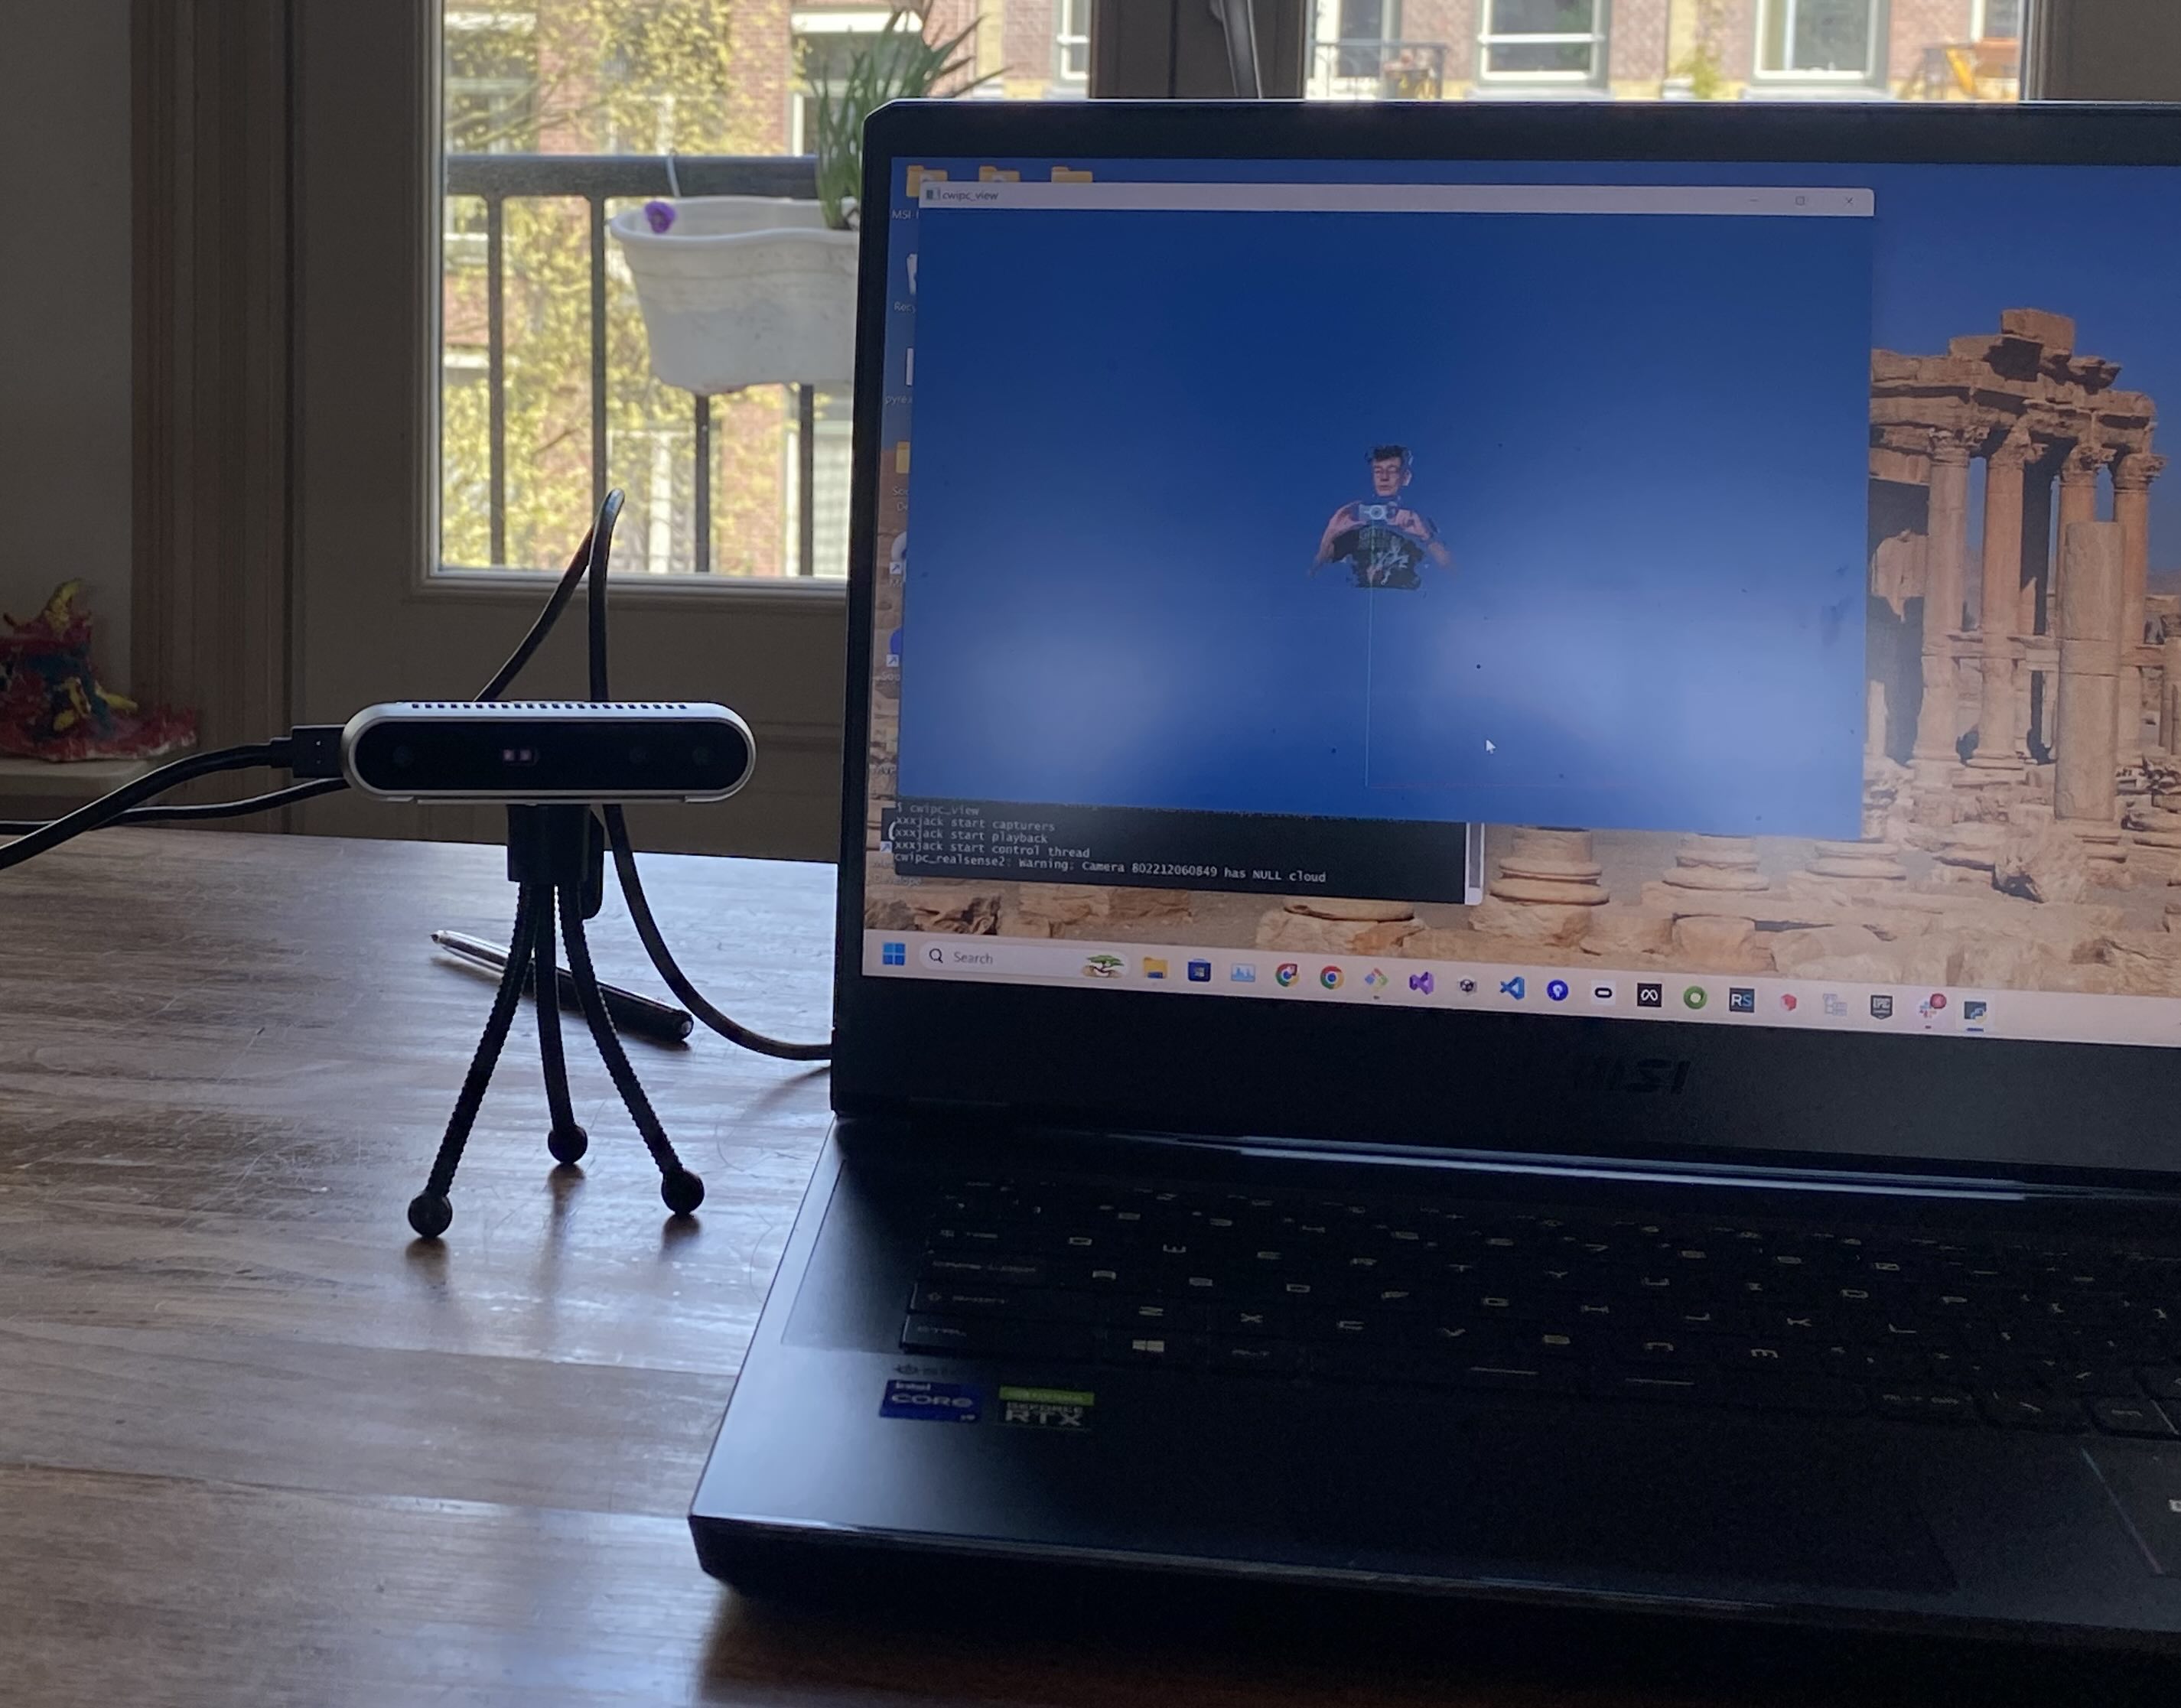
This is useful for developer testing, but it may also be usable for virtual meetings, etc.
Registering large spaces
Warning
This section is not for the faint of heart.
If you have a large space, or if not all of your cameras can see the origin, you may still be able to do a registration using the Auxiliary Aruco Markers.
In the place where you found the target-a4-aruco-0.pdf there are 5 extra markers. These can be
used as a “bread crumb trail”: put the auxiliary markers on the floor in random places, but ensure
that every marker can be seen by at least two cameras, and that there is a bread crumb trail from
every marker back to the origin marker.
You may want to print the markers at 140% (i.e. on A3 paper).
cwipc register will first do the coarse alignment only of the cameras that can see the origin
marker. But after that it will have recorded the position of some of the auxiliary markers. It will
then do a second pass, in which it will align the cameras that could see that second marker but not
the origin marker. This is then repeated until all cameras are registered.
Registering without Aruco markers
Warning
This section is not for the faint of heart.
If you need to register cameras but you cannot print the Aruco markers you can do a manual coarse registration if you have a piece of paper that is approximately A4-sized. And if you don’t even have that you can still follow this procedure but you will have to guess how big a piece of A4 paper would be, approximately, and simply select points on the floor where the A4 paper would have been.
Place it on the ground in the origin position and run cwipc register --no_aruco --nofine.
You will be presented with a 3D view of the capture. You can use the mouse and scrollwheel to change your viewpoint.
You must now select 4 points (with shift-left-click) in a specific order:
Near-left point of the A4 (from the camera view point),
Near-right point,
Far-right point,
Far-left point.
Inspect the result of this coarse calibration with cwipc view, and make double-sure that the
blue, red and green axes are pointing in the right direction (see image above).
cwipc register other arguments
The cwipc register command line utility is the swiss army knife to help you setup your cameras,
but it is rather clunky at the moment. An interactive GUI-based tool will come at some point in the future.
Use cwipc register --help to see all the command line options it has. For now, we will explain
the most important ones only:
--nofloorwill skip the floor registration step.--nofinewill skip the fine registration step.--coarsewill do the coarse registration step even if it has already been done before.--no-arucowill do the coarse registration without using the Aruco marker. You will have to select the corners of the marker manually in the point cloud viewer window, using shift-click with the mouse, and in the right order.--correspondenceallows to override the fine registration maximum correspondence distance.--help_algorithmswill list the available algorithms for coarse and fine registration, and their parameters. You can specify the algorithm to use with--algorithm_analyzer,--algorithm_coarseand--algorithm_fine.The
--verboseoption will show verbose output, and it will also bring up windows to show you the result of every step. Close the window (or pressESCwith the window active) to proceed with the next step.cwipc registerwithout any arguments will try to do all of the needed steps (but it is unlikely to succeed unless you know exactly what you are doing). It will auto-capture frames, is it is unlikely to work unless you also pass--nograband provide an image.The
--interactiveoption is an older step-by=-step version of –guided. It will show you the point cloud currently captured. You can press ``w` in the point cloud window to use this capture for your calibration step. If--rgbis also given you will be shown the captured RGB data, in a separate window. The--rgb_cwand--rgb_ccwoptions can be given to rotate the RGB images.In
--interactivemode thecwipc registerpoint cloud window works similar to thecwipc viewwindow. So you can use left-mouse-drag to pan around the point cloud, right-mouse-drag to move up and down, scrollwheel to zoom.?will print some limited help onstdout.
So, with all of these together, using cwipc register --rgb --interactive may allow you to go through
the whole procedure in one single step.